|
This is the
documentation for The Magic Seal Joiner. This file contains important
information that will help make the joiner easier and more fun to use.
Refer to this file, whenever you are having difficulties using the
joiner.
The purpose
of the joiner is to connect the rooms you created together, to create a
full stage...
Starting the
joiner
Click on "Join Rooms" in the start Menu, the joiner will open
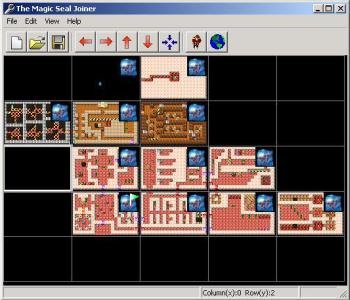
The joiner start screen looks like the following... Each empty cell
represents a room.

The tool bar
has 10 buttons, here we quickly give an explanation of each one...
Starting
from the left...
New: Creates a new map
Save: Saves the current project to a file
Load: Loads a project from file and opens in the joiner
Extra column left: Adds an extra empty column of rooms to
the left of the map
Extra column right: Adds an extra empty of rooms
column to the right of the map
Extra row up: Adds an extra empty row of rooms to
the top of the map
Extra row down: Adds an extra empty row of rooms
to the bottom of the map
Shrink to wrap: Removes all unnecessary empty rows or columns
Specify starting position: Selects the location from which to
start the stage
Generate: Generates the stage and map files for use in the game
Scenario
for using the joiner
The joiner
is extremely easy to use. Here are easy-to-follow steps to show you how
to use the joiner
1. Have your
room files ready
The joiner just joins the rooms together. It does not create them. You
should have your room files already designed. So, the first step is
always to use the editor to create all the rooms of the stage, and save
them. Now, start the joiner.
2. Load your
rooms in the joiner
Double click on any cell in the joiner, an open dialog will appear.
Choose the room file you want to put in this cell, and press OK. A
thumbnail of your room will appear in this cell. Keep loading rooms till
you have loaded all your rooms of the stage...
It should
look something like this...
You may need
to add extra rows or columns up, down, left or right. Don't panic. Just
use the 4 red arrow buttons in the toolbar, to expand the map as
necessary.
Note: It is
extremely important that you verity that the rooms do connect together
correctly. Each door in a room, has to have a corresponding door from
the other side that is the same color. Each wall has to have a
corresponding wall from the other side. If you don't do that, storage
results may arise!
3.
Modify the map attributes
Now, the rooms are connected. We need to specify which rooms appear on
the map, which rooms are secret, and which rooms don't appear.
As you can
see, there is a small map icon at the top right of every room. Right
click it to change. There are three possible settings. If there is an
icon of a map as appears in most of the rooms in the screen shot above,
it will appear on the map, as a normal room. If it is a map with a red X
on it, this room will not appear on the map at all. If it is a map with
a big exclamation point on it, this is a secret room. It will appear as
dim blue room when discovered by the player.
A special room is the room with the map in it. This one shows a map,
with a green flag on it. You can't change the attributes of this room.
Note: There
can be only one map per stage! you can't put more than one map in the
same stage.
4.
Connecting rooms with elevators, if there are any
If there are elevators in your stage, you will need to connect the rooms
together. You have to specify which room leads where.
If there are elevators in you stage, a small elevator icon should
appear at the top left, or the bottom left of the room thumbnail. Here
is an example...

As you can
see the room to the left, has 2 elevators, one going up, and one going
down. The 2 other rooms have one elevator each.
To connect the rooms together, click on the appropriate icon, and drag
to the destination room. In other words, for the example above, if you
want to connect the three rooms, you should...
1. For the leftmost room, click on the red arrow, and drag to the room
with the down elevator
2. For the same room, click on the blue arrow, and drag to the room with
the up elevator (the one below)
3. For the room at the top right, click and drag on the blue arrow to
the room to the left.
4. Do the same for the room at the bottom right.
And done,
they are connected...
Note 1: It
is very important that when you design rooms with elevators, that you
take care each elevator is at exactly the same location as the one it
leads to! If the game detects an elevator that goes to a room without an
elevator, in exactly the same location, it will simply close!
Note 2: For
the rooms with elevators, only the one at the base level should appear
on the map. You should remove all the other rooms from the map, by
clicking on the map icon till it becomes a map with a big X on it!
Note 3: If
you click on any room with an elevator after connecting, the 2 rooms it
is connected 2 will be highlighted. The upper room will be highlighted
red, and the lower one will be highlighted blue. (the same colors as
their corresponding arrow).
5.
Specifying the start location
Click on the room to start the game from. Click on the icon with the
prince, an image for the room will open. Just click on the square you
want the player to start from, and click Done.
6.
Generating the stage, and the map
Click the globe icon to generate the stage. If there are no errors (All
elevators are connected, and the starting location has been specified),
an open dialog will appear. Choose the name of your stage, and click Ok.
And done!
You can run your stage now, by double clicking on it in the Explorer...
Note: Two
files will be generated, one with the extension (.stage), and the other
with the extension (.map). They should be kept together.
Note 2:
Because your stages are not the official stages, the game will not be
able to detect the end of your stage. It is recommended that you have a
special room that indicates the end of stage. An example of such a room
is winningroom.room found in the samples directory. Feel free to use it,
or modify it to better suit your stage. Or, of course, you can create
your own.
We hope you enjoy using the editor and the
joiner... |

